Mastering Plaid Patterns with Procreate: A Designer's Guide
There’s something undeniably classic about plaid. It evokes a sense of heritage, warmth, and structure, whether it’s on a tailored wool coat or a rustic throw pillow. Translating that intricate, woven look into a digital format, however, has historically been a tedious process of aligning lines and managing layers. The Plaid Texture Brush Set for Procreate changes the game for digital artists, offering a streamlined workflow that mimics the tactile experience of weaving fabric right on your iPad. If you are a designer, crafter, or entrepreneur looking to add a sophisticated textile feel to your work, understanding how to leverage this tool is essential.
The Anatomy of the Plaid Texture Brush Set
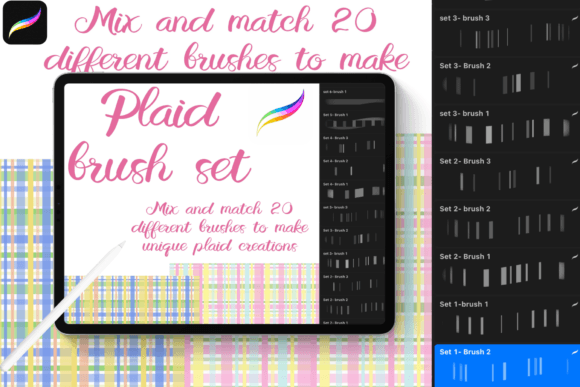
At its core, this collection is more than just a standard premium font or a static overlay; it is a dynamic system of 20 distinct brushes designed to work in harmony. Each brush offers a different weight, texture, and spacing of lines, allowing you to construct patterns that range from delicate gingham checks to bold, heavy tartans. The visual appeal lies in the layering. Unlike a flat vector pattern, these brushes allow you to build depth. You can create a look that mimics the slight imperfections of wool fibers or the smooth finish of a printed digital textile.
The "personality" of this set is versatile. It can be playful and bright for a children’s brand, or it can be moody and sophisticated for a high-end fashion label. Because the brushes are texture brushes, they interact with the canvas in a way that solid lines cannot. They provide a hand-crafted aesthetic that feels organic, moving away from the sterile perfection often associated with digital design. This makes the Plaid Texture Brush Set for Procreate an invaluable asset for anyone trying to humanize their brand identity.
Practical Application: Weaving Your First Pattern
While the concept of creating a plaid might sound complex, the workflow is surprisingly intuitive. The set is engineered for efficiency, allowing you to mix and match brushes to achieve unique results. To get started, you simply select a canvas and choose your first brush. Let’s walk through a practical example of how to utilize this set effectively.
First, establish your vertical foundation. Select Brush 1 from the set and choose a primary color, perhaps a deep forest green. Draw vertical lines across your canvas. Then, switch to Brush 2 with a secondary color, like a muted yellow, and add another layer of vertical lines to create a base stripe. You can introduce a third element with Brush 3 in a contrasting blue to add complexity.
The magic happens in the second phase. Turn your canvas so that your vertical lines are now horizontal. This is the crucial step for creating an authentic weave. Now, using the same sequence of brushes but perhaps rearranging the colors, draw over your existing lines. For instance, use the green with Brush 1, the blue with Brush 2, and the yellow with Brush 3. The overlapping textures will instantly create the illusion of threads weaving over and under one another.
Strategic Uses in Branding and Marketing
For marketers and entrepreneurs, the utility of the Plaid Texture Brush Set for Procreate extends far beyond simple illustration. In packaging design, a custom plaid can become a signature element. Imagine a boutique candle brand using a soft, muted plaid texture on their box sleeves to communicate warmth and comfort. Because you can control the density and color, you can ensure the pattern aligns perfectly with your brand identity.
In editorial design and social media graphics, these textures serve as excellent backgrounds. A busy plaid can sometimes overwhelm text, but using a single, subtle brush from the set with low opacity can create a textured background that adds visual interest without sacrificing readability. This is a common technique used in web design to break up flat color blocks and guide the viewer's eye.
Technical Considerations and Compatibility
Before diving into a project, it is important to note the technical requirements. This creative font and brush system is designed exclusively for the iPad environment. To utilize the Plaid Texture Brush Set for Procreate, you must have the latest version of the Procreate app installed. This ensures that all pressure sensitivity and texture rendering features function correctly.
The installation process is straightforward, designed to get you working quickly. Once you purchase the set, you will receive a confirmation email with a download link. After downloading the files to your iPad—whether directly, via Dropbox, or Airdrop—you simply need to select "Open in Procreate" or "Copy to Procreate." The brushes will appear in your library, ready for immediate use. There is no complex conversion required; the files are optimized for the Procreate environment.
Elevating Your Design Assets
Whether you are a crafter making digital planners, a small business owner designing seasonal flyers, or a graphic designer working on a large-scale campaign, the ability to generate custom patterns is a significant advantage. Instead of searching for stock images that might not fit your exact color palette, you have total control. You can match the plaid to specific hex codes, ensuring consistency across all your design assets.
Think about seasonal marketing. Plaid is synonymous with the fall and winter holidays. By using this brush set, you can rapidly generate unique backgrounds for "Sale" announcements or holiday greetings that look bespoke rather than generic. This attention to detail can significantly impact audience engagement, as customers often respond to visuals that feel curated and high-quality.
Final Thoughts on Texture and Style
The Plaid Texture Brush Set for Procreate bridges the gap between digital convenience and tactile aesthetics. It allows you to incorporate the timeless style of tartan and gingham into modern graphic design workflows without the headache of complex vector math. By understanding how to layer colors and rotate the canvas, you unlock a world of pattern possibilities that can elevate your branding, packaging, and personal art projects. It’s a practical, efficient, and stylish addition to any designer’s toolkit.